How to set up an I-Gate APRS receiver on Raspberry Pi (Zero) and USB Sound Card, using old FM handheld radio? It is not a very simple task, but I hop that with my small tutorial it will become easier.
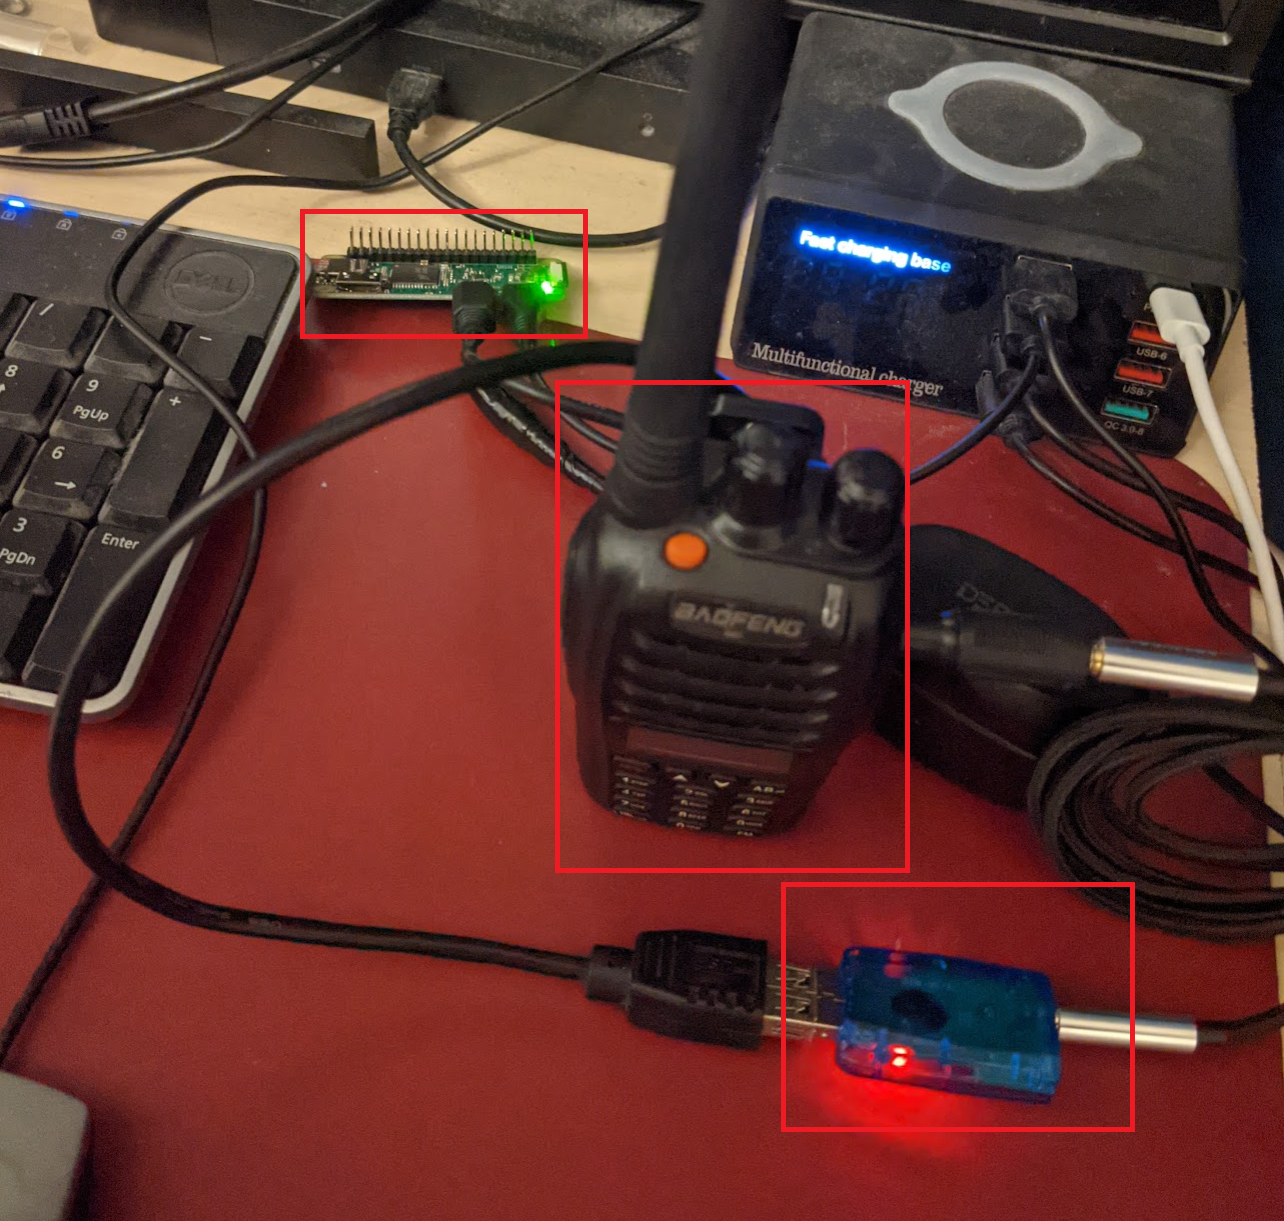
As you can see on the picture above, you do not need a lot. To be honest, using the equipment above you can run a real two way APRS digipeater, however to do that you will need a repeater licence (in the UK – from Ofcom).
Anyway, I am not going to describe how to install a Raspberry Pi OS, there is a lot of tutorials online. Here I describe how to install and set up a Direwolf software on Raspberry Pi. Some commands take dozen minutes to be executed (on Pi Zero) so please be patient.
Let’s start:
Raspbian update:
>> sudo apt-get update
>> sudo apt-get dist-upgrade
>> sudo rpi-update
>> sudo reboot
Remove pulseaudio (in case it was installed previously):
>> sudo apt-get remove –purge pulseaudio
>> sudo apt-get autoremove
>> rm -rf /home/pi/.pulse
>> sudo reboot
Software development packages:
>> sudo apt-get install git
>> sudo apt-get install gcc
>> sudo apt-get install g++
>> sudo apt-get install make
>> sudo apt-get install cmake
>> sudo apt-get install libasound2-dev
>> sudo apt-get install libudev-dev
Remove old install:
>> sudo rm -rf direwolf (remove old install)
Install Direwolf:
>> cd ~
>> sudo git clone https://www.github.com/wb2osz/direwolf
>> cd direwolf
>> sudo git checkout dev
>> sudo mkdir build && cd build
>> sudo cmake ..
>> sudo make -j4
>> sudo make install
>> sudo make install-conf
This gives you the latest development version.
Leave out “git checkout dev” to get the most recent stable release.
Make direwolf executable:
>> sudo chmod a+x direwolf (I think I had a problem here and I had to find the correct folder which is /home/pi/direwolf)
Important command, which you need to type to find out what exactly is the sound card called, so you can use a correct name in the conf file:
>> aplay -l
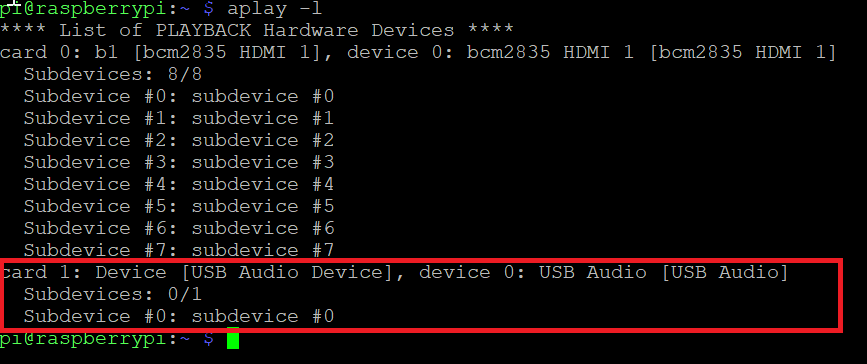
On the picture above you can see that my sound card in conf file will be called plughw:1,0
Configuration direwolf.conf:
>> sudo nano /home/pi/direwolf.conf – the file does not exists by default and needs to be created, however the sample config is here and you can copy it into the right folder:
sudo cp /home/pi/direwolf/build/direwolf.conf /home/pi/
ADEVICE plughw:1,0
CHANNEL 0
MYCALL M0PPR-10
MODEM 1200
AGWPORT 8000
KISSPORT 8001
IGSERVER euro.aprs2.net
IGLOGIN M0PPR-10 ***** replace ***** with password generated at http://apps.magicbug.co.uk/passcode/
PBEACON sendto=IG delay=0:30 every=10:00 symbol=”igate” overlay=R lat=50^50.111N long=1^07.111W comment=” RX only igat$
IGTXLIMIT 6 10
TTPOINT B01 37^55.37N 81^7.86W
TTPOINT B7495088 42.605237 -71.34456
TTPOINT B934 42.605237 -71.34456
TTPOINT B901 42.661279 -71.364452
TTPOINT B902 42.660411 -71.364419
TTPOINT B903 42.659046 -71.364452
TTPOINT B904 42.657578 -71.364602
TTVECTOR B5bbbddd 37^55.37N 81^7.86W 0.01 mi
TTGRID Byyyxxx 37^50.00N 81^00.00W 37^59.99N 81^09.99W
TTUTM B6xxxyyy 19T 10 300000 4720000
TTCORRAL 37^55.50N 81^7.00W 0^0.02N
TTMACRO xx1yy B9xxAB166AA2B4C5B3B0A1yy
TTMACRO xx2yy B9xxAB170AA3C4C7C3B0A2yy
TTMACRO xxyyy B9xxAB180AA3A6C4A0Ayyy
TTMACRO z Cz
If you use nano as a text editor, use CTRL-X and then Y (yes) to save the file and exit.
Update direwolf:
>> sudo apt-get update
>> sudo apt-cache showpkg direwolf
>> sudo apt-get install direwolf
Now to run the software you just simply need to type… direwolf 🙂
IMPORTANT update – please scroll down

One extra thing – you need to adjust very precisely the audio volume, on the picture below you can see that a volume know on 1/3 volume was still providing way too much audio:
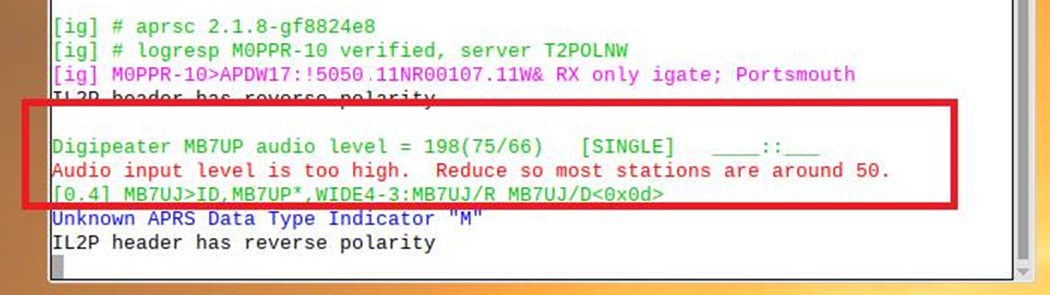
You have to adjust it with a 1mm precision or… you can make some extra feature using spare resistors:
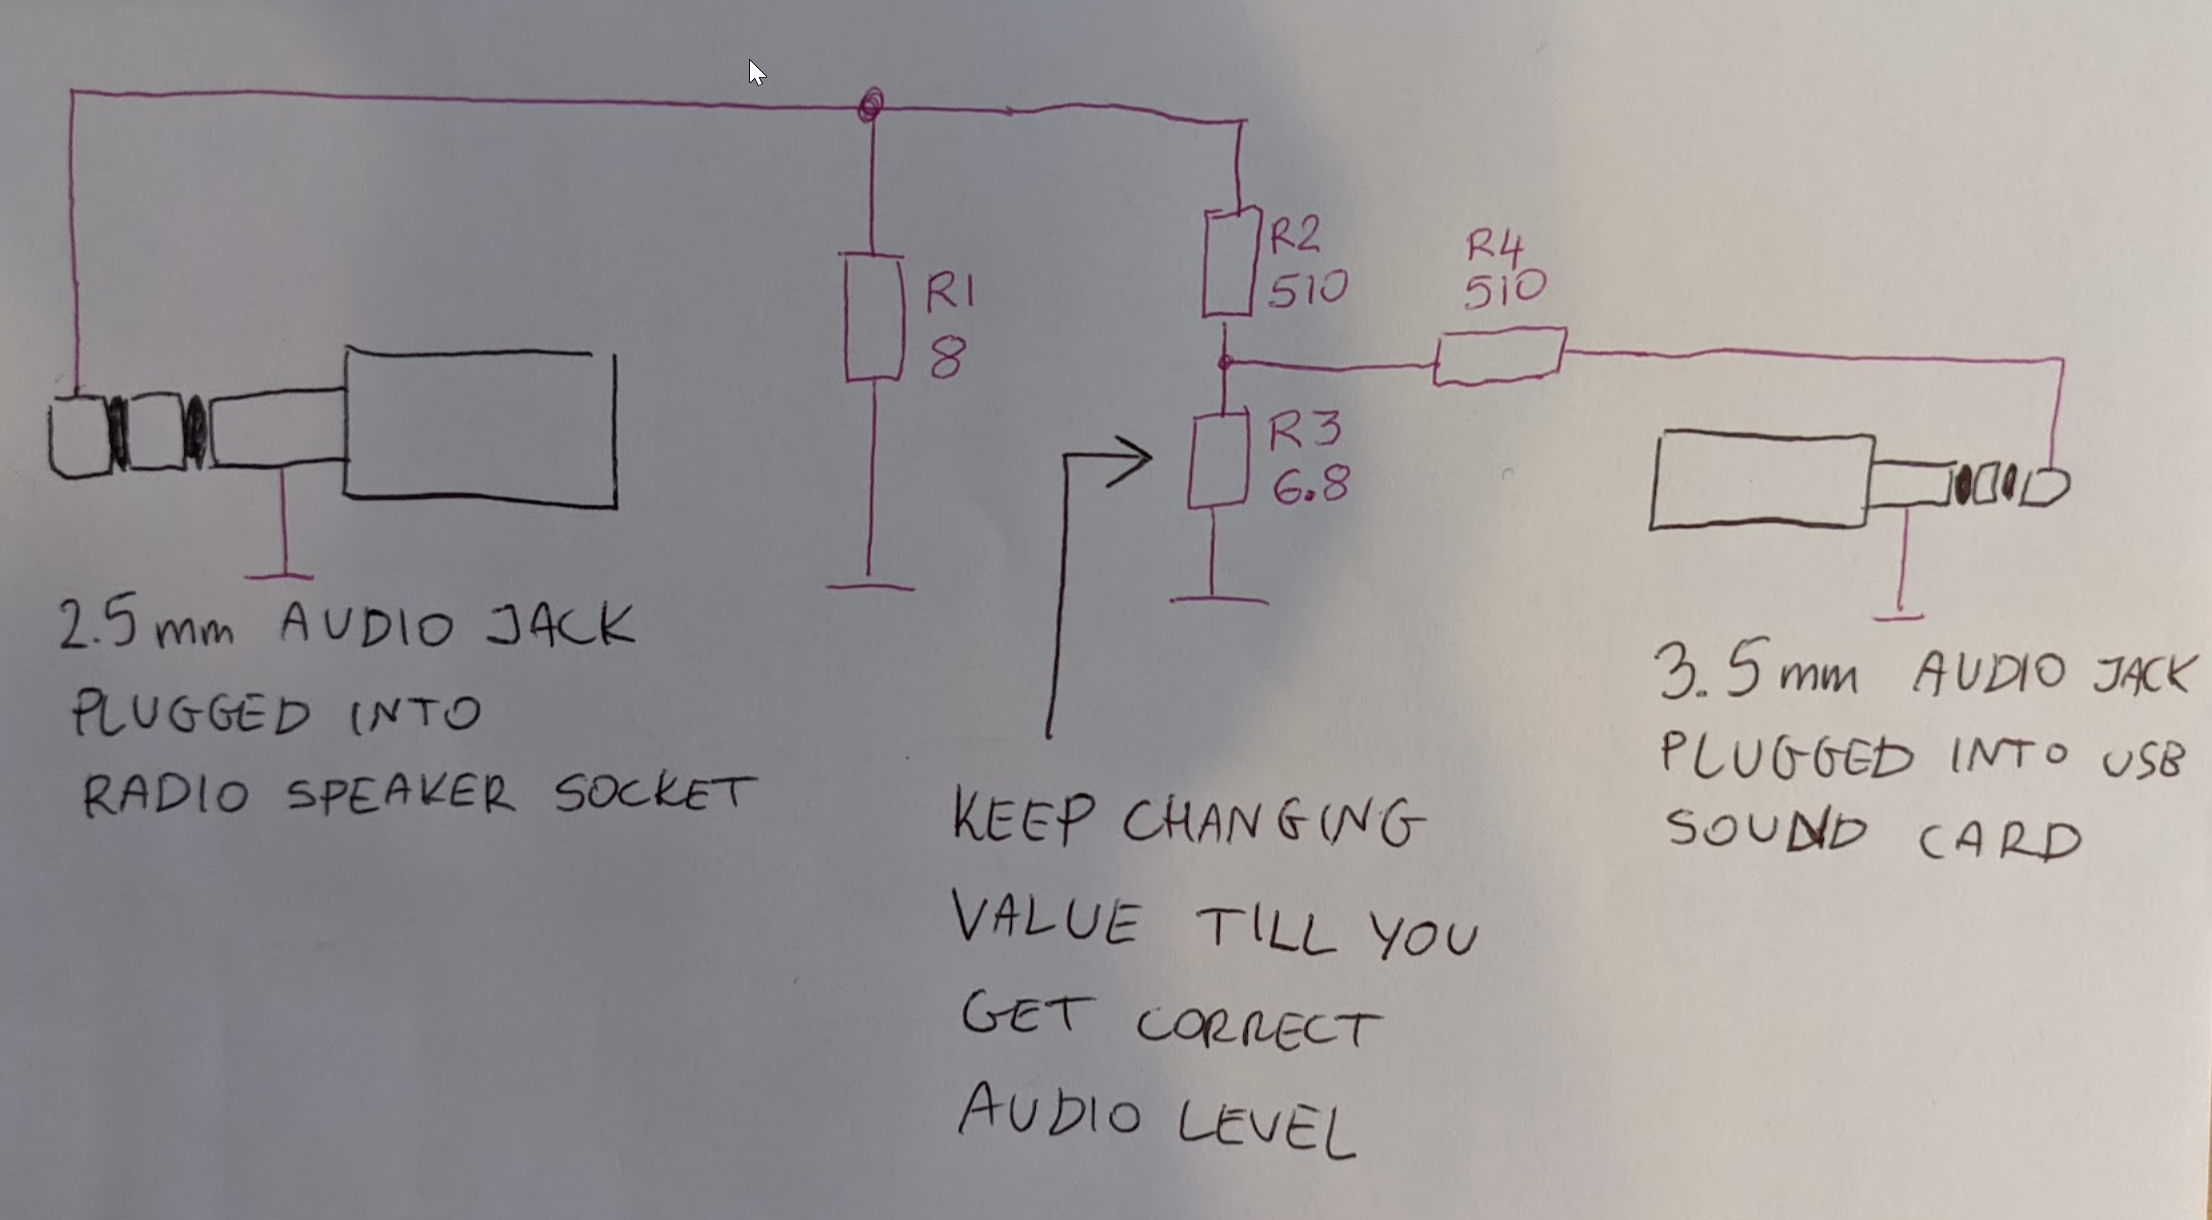
With the solution from the picture above I can just simply keep the volume know turned to the maximum volume.
The right level of audio is around 50, of course you will have to adjust your resistors to your own set up, especially resistor R3

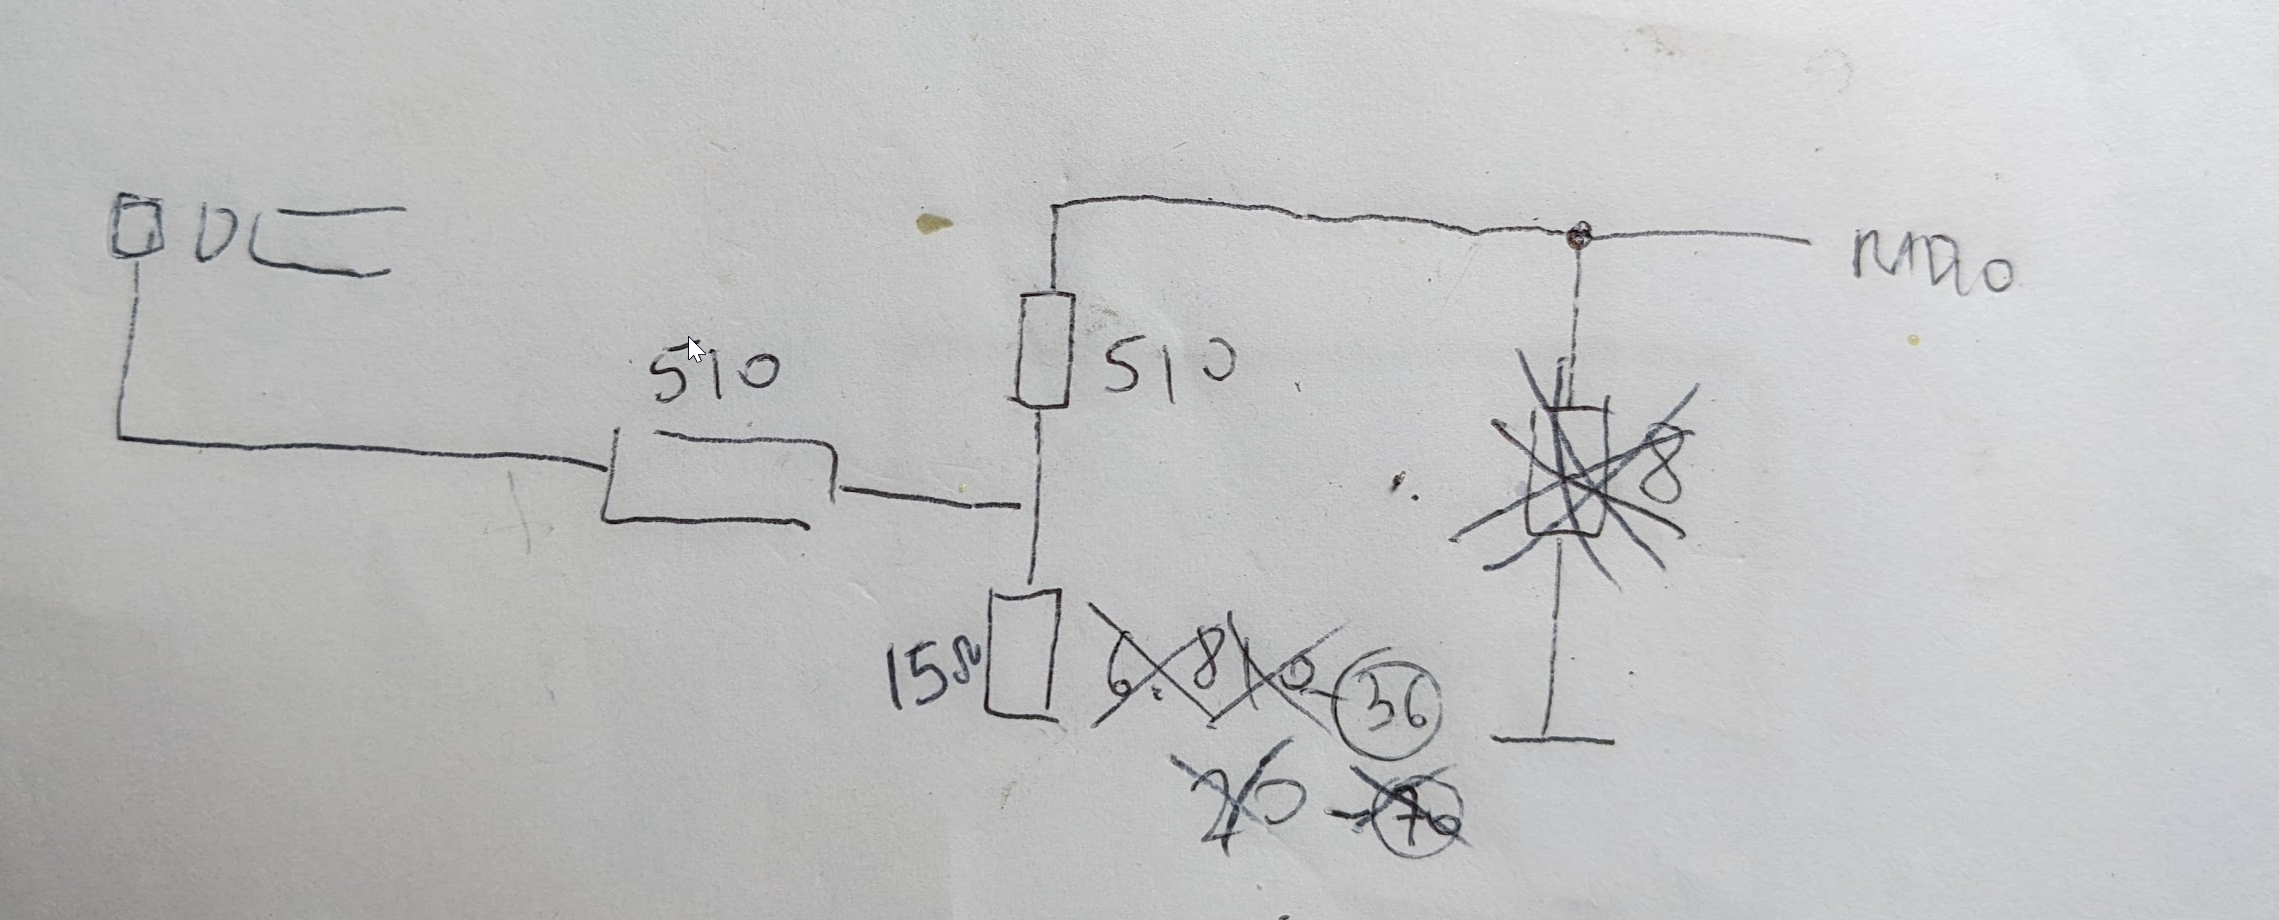
Finally I decided to use Motorola GM340 as my APRS iGate receiver, and the diagram below shows resistor values I found correct for my radio:
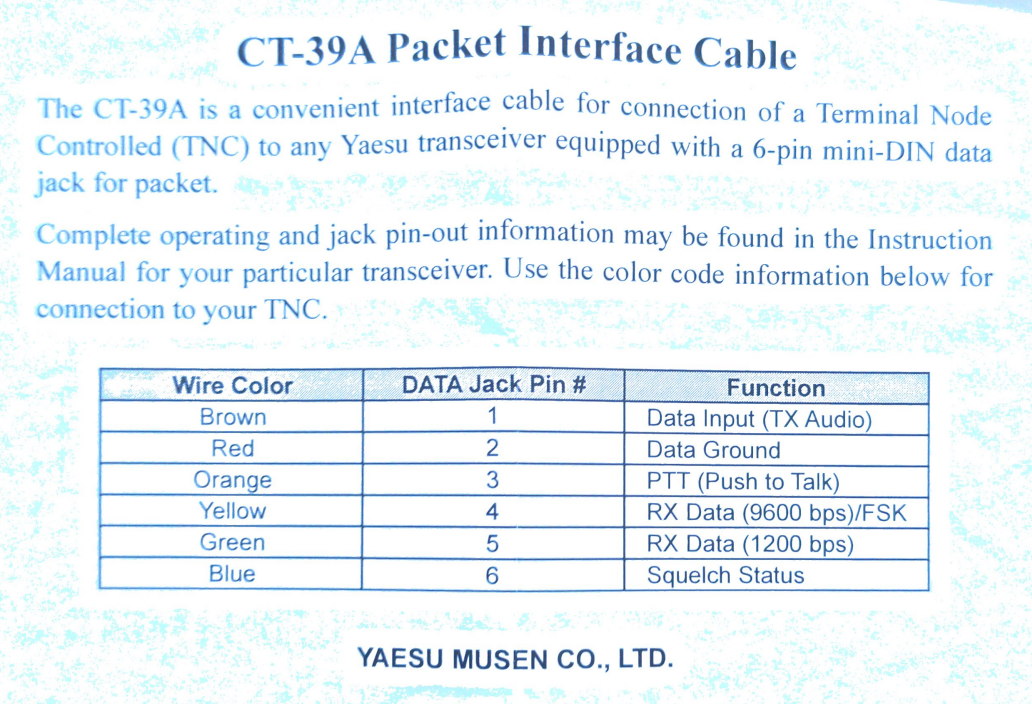
I have also created a cable working well with Yaesu 7800 / 7900 / 8900 – resistors are set up to provide recommended level 50 in direwolf software – diagram below. Colours of the cable coming into the back of the Yaesu radio are matching colours of the original, genuine Yaesu cable CT39A. If you use your iwn cable, just make sure you use correct pins.
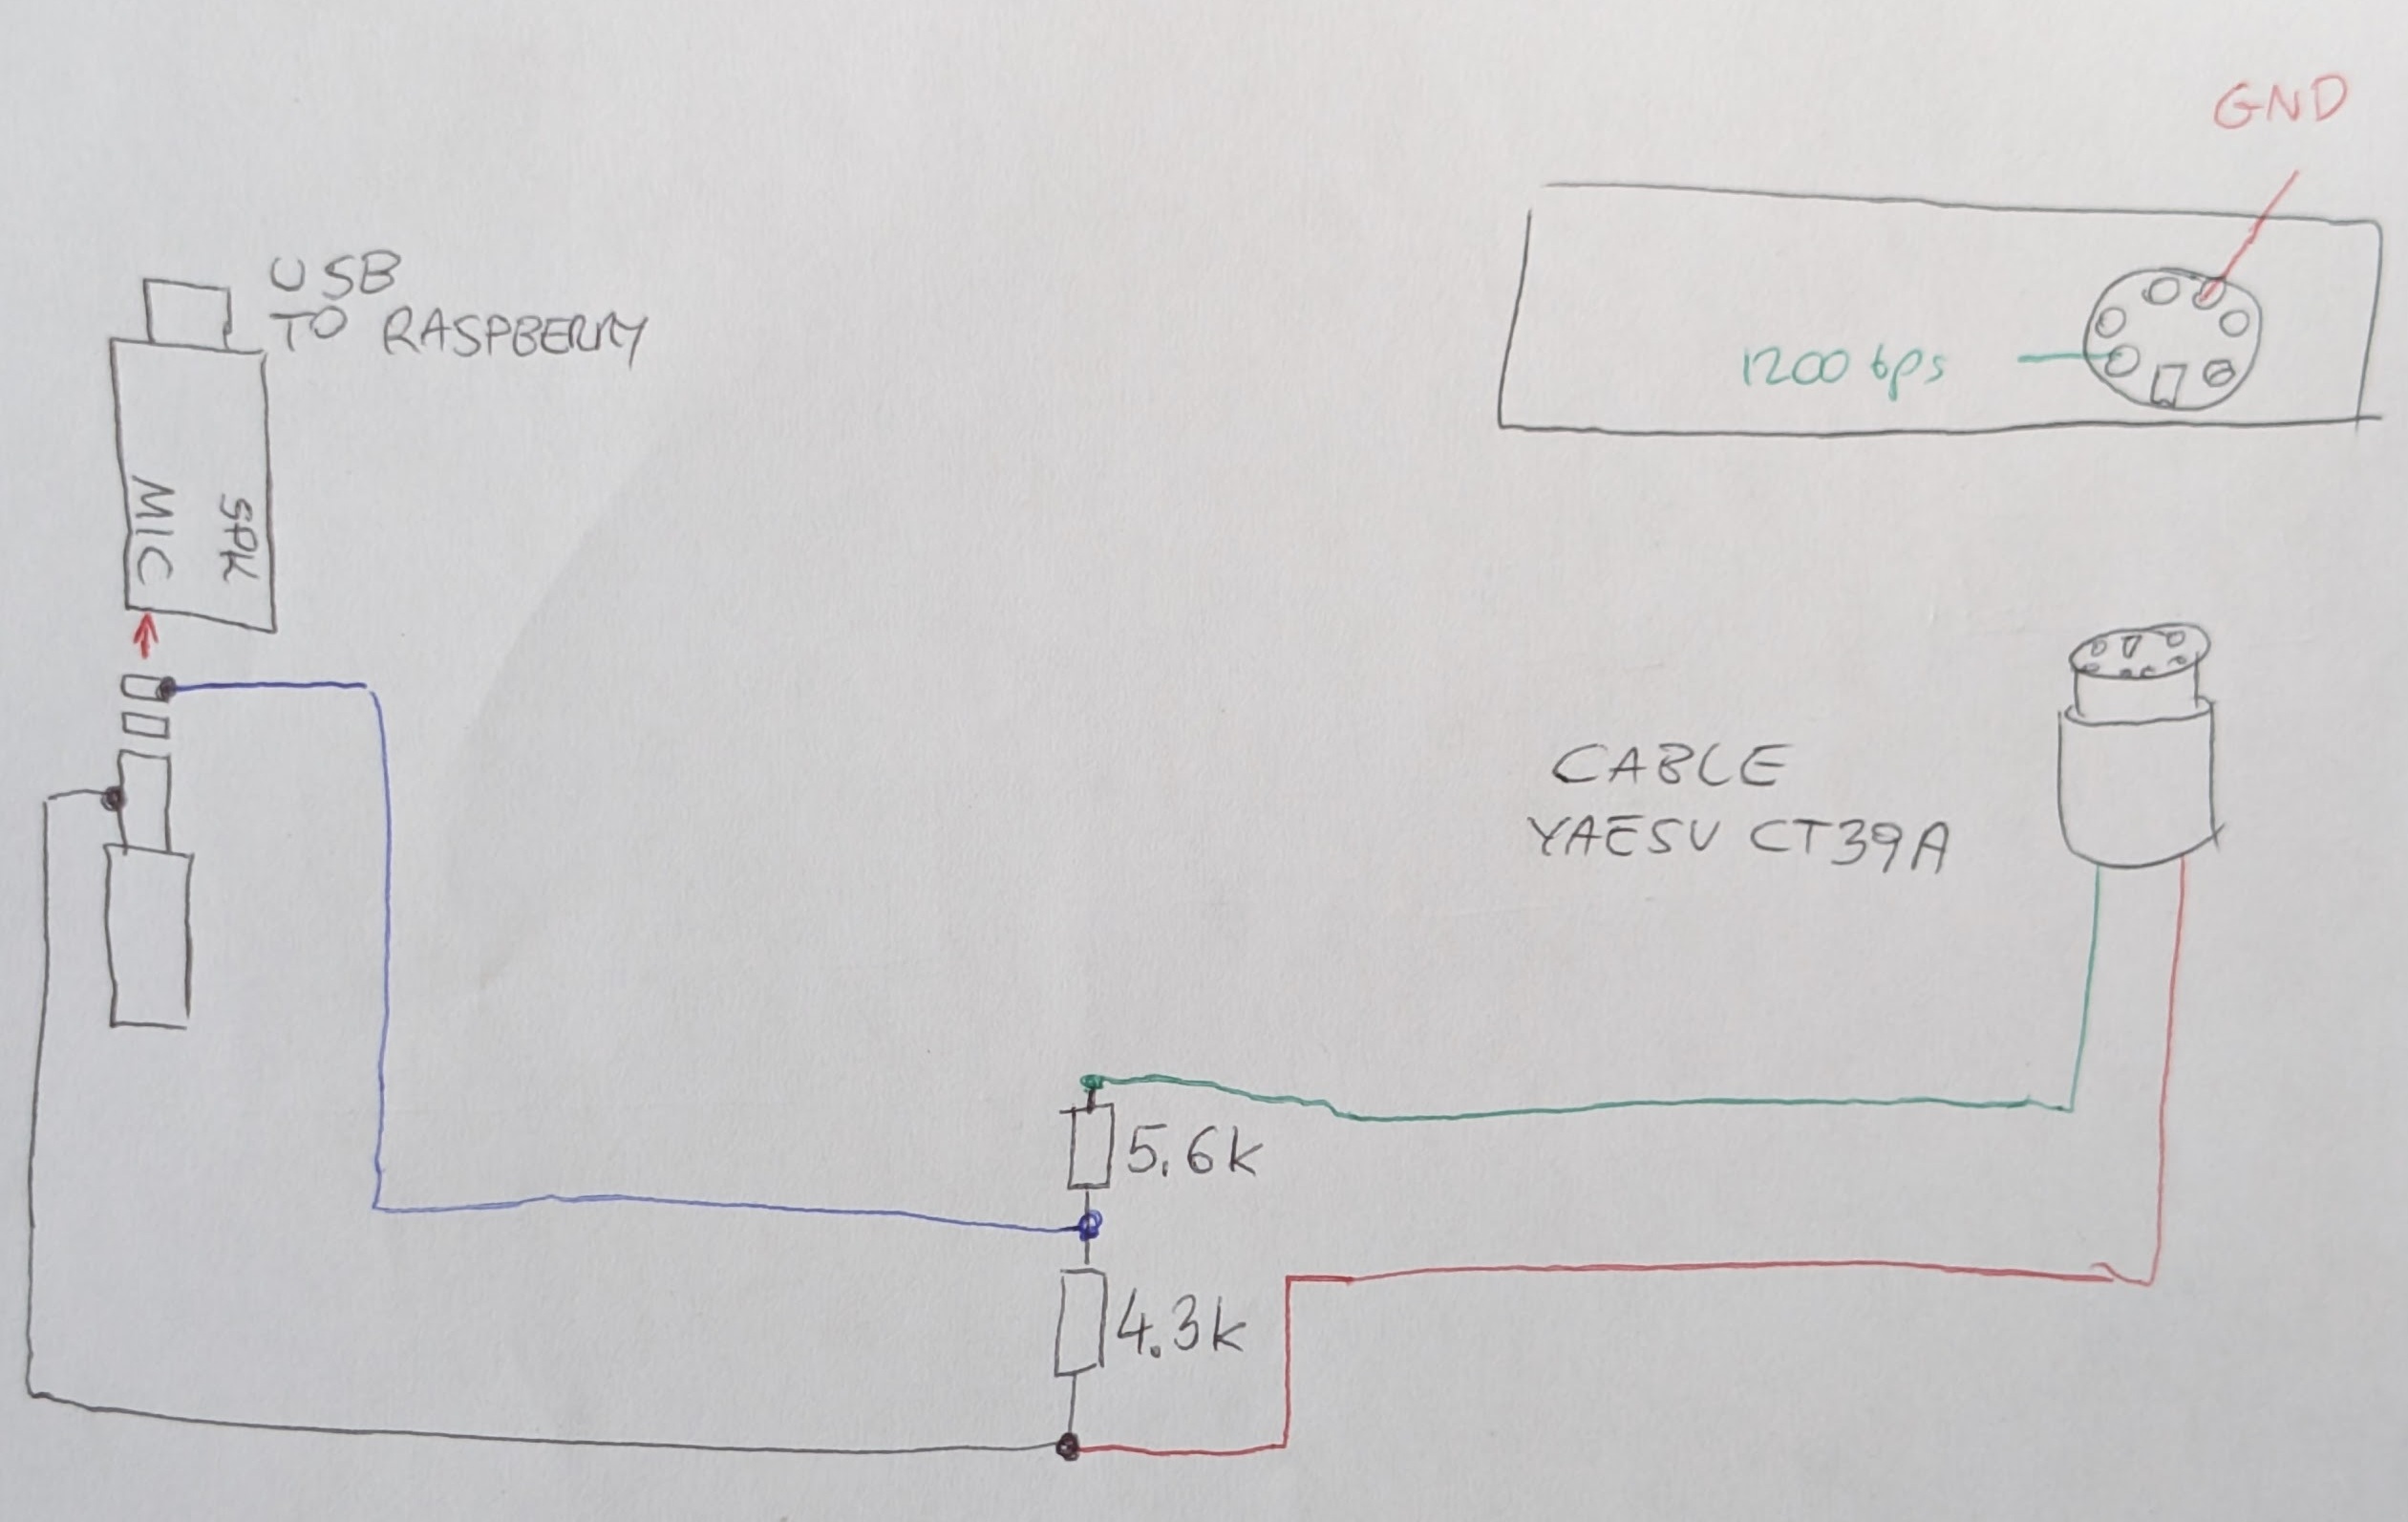
Radio should be (in Europe) set up to 144.800MHz and channel set up to narrow (not wide). However, in the US everybody is apparently using the wide setting.
UPDATE:
To start the software you need to open ssh and type direwolf. But, the SSH window must stay opened, otherwise by closing the SSH window, you will close the direwolf.
Quite good solution is to instal RDP – Remote Desktop – to find out how to do it go HERE.
Now, after connecting to Raspberry Pi GUI you can just simply open Direwolf:
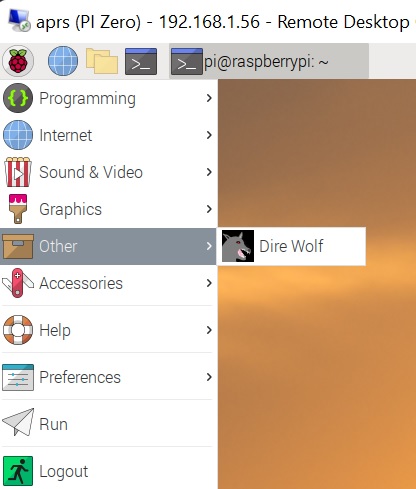
Now, you can simply close the RDP client window and the Direwolf process will stay active! 🙂
But… it is still not all what you can do. The problem is if there is a power shortage, after restarting Raspberry Pi the Direwolf will not start up.
To get it right, you need a script running Direwolf. The file is called dw-start.sh and should be located in /home/pi folder. If the file does not exist, you can copy the file into the right place using command:
sudo cp /usr/local/share/doc/direwolf/scripts/dw-start.sh /home/pi/
Now you need to check, if the file is executable. If not, type:
sudo chmod +x /home/pi/dw-start.sh
Now if you run direwolf in CLI (text) mode, edit file
sudo pico /home/pi/dw-start.sh
and replace AUTO with CLI
If “screen” (we will need it later) is not installed, you need to do it by typing (probably it is a good idea to install it BEFORE adding the script to cron):
sudo apt-get install screen
Now, you get the script running, you need to add info into the cron. To do it you need to type:
crontab –e (without sudo)
and add line:
* * * * * /home/pi/dw-start.sh >/dev/null 2>&1
The script will keep checking every single minute if the Direwolf process is working. If not, it will be get started.
IMPORTANT!!: To still unknown to me reasons the cron was unable to run the Direwolf script. I found I had to type:
crontab -r to remove the cron file and then type again crontab -e and I had to add line * * * * * /home/pi/dw-start.sh >/dev/null 2>&1 again… I have a feeling it was a problem with coding for special characters after copying things like &. Probably it is safer to copy the cron line from PDF document page 28 from Direwolf manual. Or type everything manually, which is not a problem, as it is just one not very long line.
I still do not know how to bring on screen working in background Direwolf process in GUI.
However, I know how to do it in CLI mode 🙂
So inside of file dw-start.sh change GUI or AUTO option to CLI:
RUNMODE=CLI
Restart Direwolf
Now we need to find out what is the process number for Direwolf, type:
screen -list (or screen -ls)

Of course every single time the process number will be different, so check it every time.
Now type:
screen -r 5977 (change it to your number!)
We get a Direwolf working 🙂
If you want to leave the window, simply press “CTRL+A” (release) and then “d” to get detached from the window
Sources:
http://hb1bbs.com/Raspberry-Setup/
https://n1aae.com/raspberry-pi-aprs-direwolf-linux-igate-digipeater/
https://github.com/wb2osz/direwolf
http://apps.magicbug.co.uk/passcode/
https://www.pgc.umn.edu/apps/convert/ – a very good converter, its format cooperates with direwolf config file.