Just a few months ago I did not know too much about the DMR system. I actually had roughly 15 years long break from amateur radio! So I decided to come back when a lot of people already started the DMR adventure. So when I decided to join the DMR team, I struggled a bit to understand how the system works. My first steps with DMR were with TYT MD380 – a very popular DMR radio. I even managed to flash the radio with 200k contacts, using Virtual Machine – ARTICLE HERE. So to get the access to the network I was using a local DMR repeater. However, the repeater sometimes was too busy and I could not use my favourite groups. Then, I heard a lot of people saying they that they use a DMR hotspot. A very quick research gave me the answer – it is a extremely small home UHF DMR repeater, using only 10mW power! Actually, with my handheld radio and very small (5cm) antennas on the hotspot, I found it has roughly 300 meters range – amazing for using this around home! The 300 meters range was for the signal going through a lot of houses, so I can only guess with a direct visibility (eg. at the country side) the result could be much better! So I very quickly typed hotspot on Amazon and… I did not know what to buy. I had to spend another 2h to make sure I am buying the right thing.
Anyway, just in case somebody needs a small help would like to talk what actually you can buy. Before we start, I would like to mention that every single DMR hotspot MUST be made from:
- a Raspberry Pi (usually Zero W, W – means wireless, equipped with WiFi and Bluetooth, Raspberry with no letter has got no wireless connections).
- another PCB with the MMDVM repeater and a radio UHF hardware (transceiver).
- optionally the hotspot can be equipped with OLED display, however I do not find it useful at all
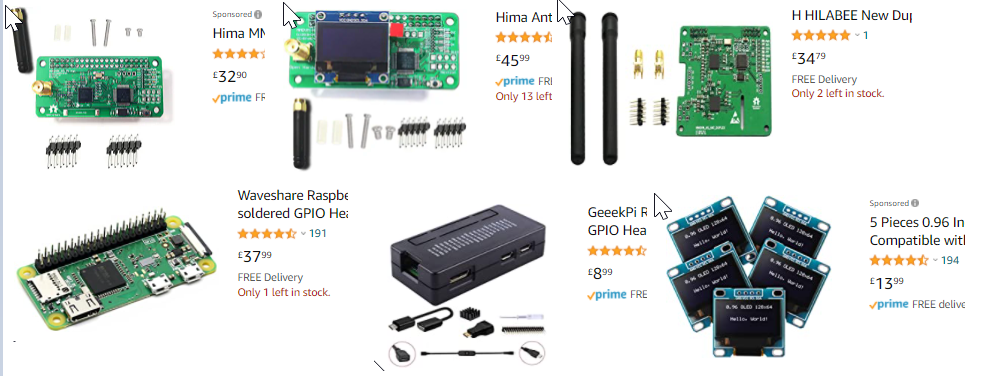
So, when you type DMR hotspot on Amazon you get:

These two above are hassle free. They are size of a credit card. They both are made from Raspberry Pi Zero W and repeater PCB plus OLED display. First one (left) is a simplex one, the other one (right) is a duplex one. I definitely recommend the duplex one! The duplex hotspot let you divide (this is the way how I did it!) very busy groups and put them on slot 1, and some local groups to keep them on slot 2. How to do it – in the next paragraphs.
See above. Instead of buying ready for use, hassle free box, you can assemble your own one. You need to buy a repeater and Raspberry Pi (usually Zero W). You can also buy Pi 3 or even 4 but they are too powerful for the purpose – money wasting. Also some repeaters do not work with Pi 4, so Pi 3 is a safe maximum.
So on the picture from top left we can see:
- simplex repeater with no OLED display
- simplex MMDVM repeater with OLED display
- duplex MMDVM repeater with no display
- Raspberry Pi Zero WH (W – wireless, H – soldered header – pins to connect together with the repeater)
- Case (the one from the picture probably is too small for the set)
- Optional OLED display
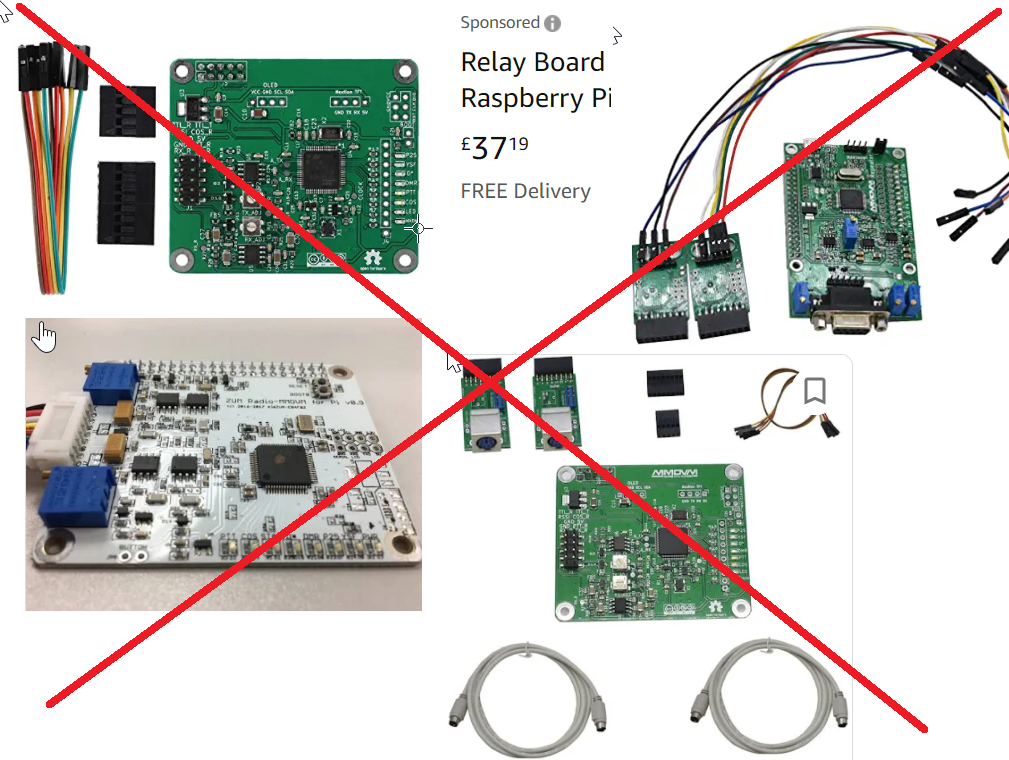
Important! If you see anything like on the picture below, generally MMDVM PCBs without any SMA antenna connectors, DO NOT BUY!! What you probably see is a PCB for a proper repeaters with external radios (very often Motorola DM380 etc). These PCBs have got the same hardware except they do not have any radio transmitters on them.
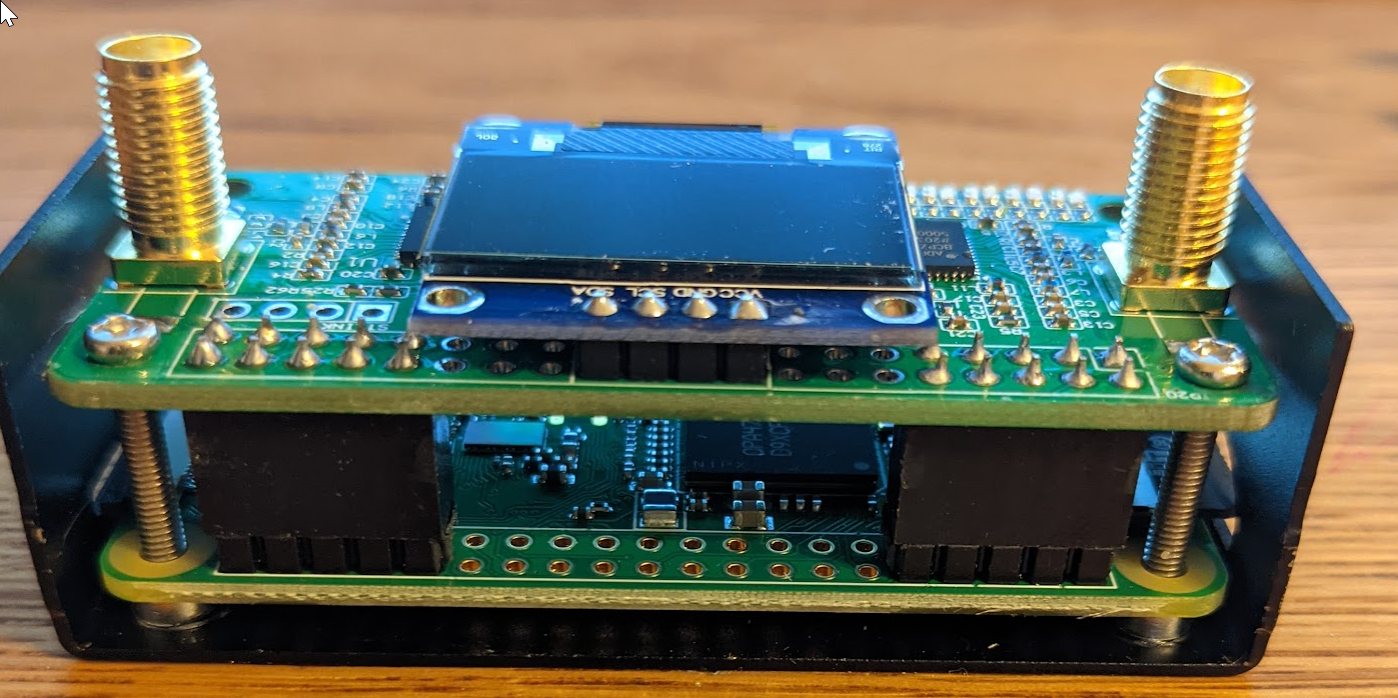
So as you can see buying ready for use hotspot is not a very bad idea, especially that it comes with a pre-configured operation system on the SD card. If you wonder what it looks like inside – look at the picture below:

Now, when we have got our hotspot ready, these are the next steps:
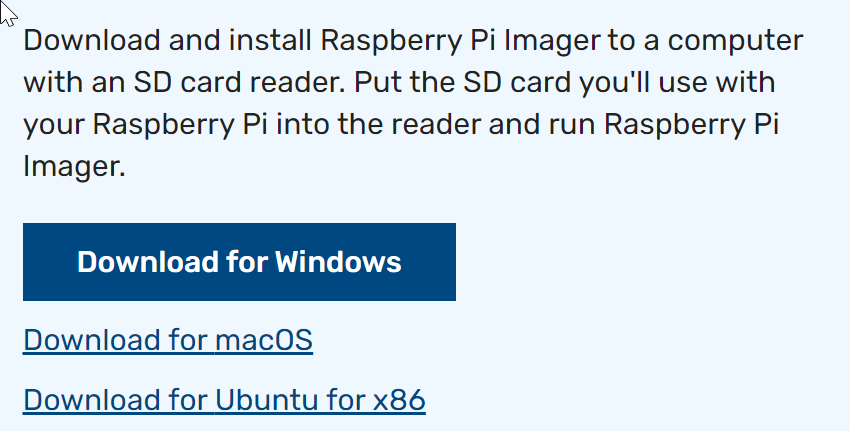
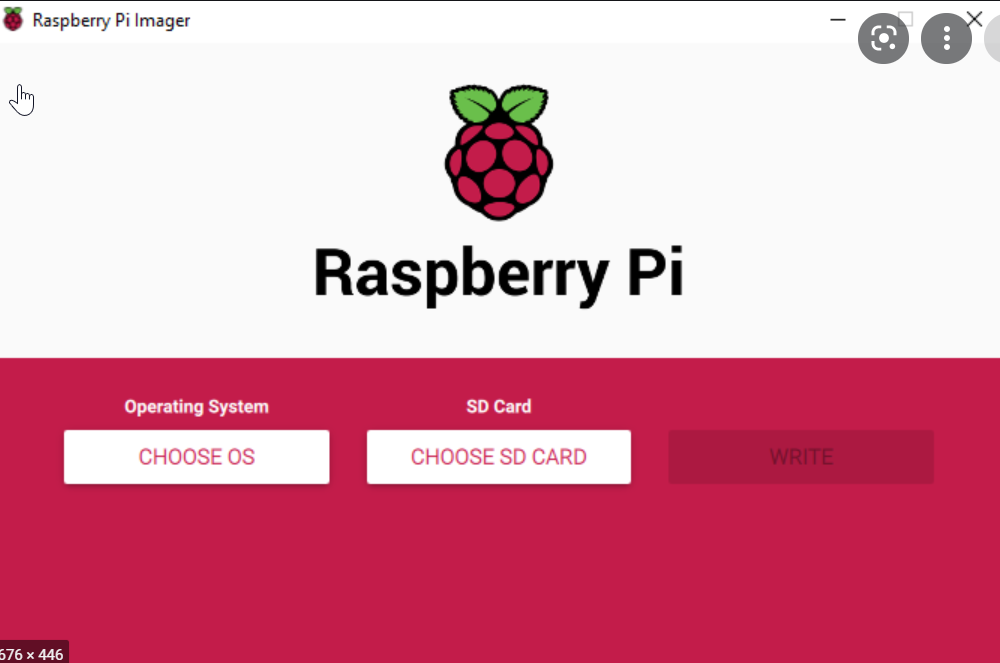
- If you bought ready to use DMR hotspot, probably it comes with a SD card with operation system and software running the DMR hotspot. Without the SD card the DMR hotspot is dead, like a computer without HDD. If you ordered the DMR hotspot and it comes with SD, you can skip this step. If you have to make your SC card, you need to download a Raspberry Pi Imager from this site: https://www.raspberrypi.org/software/ .
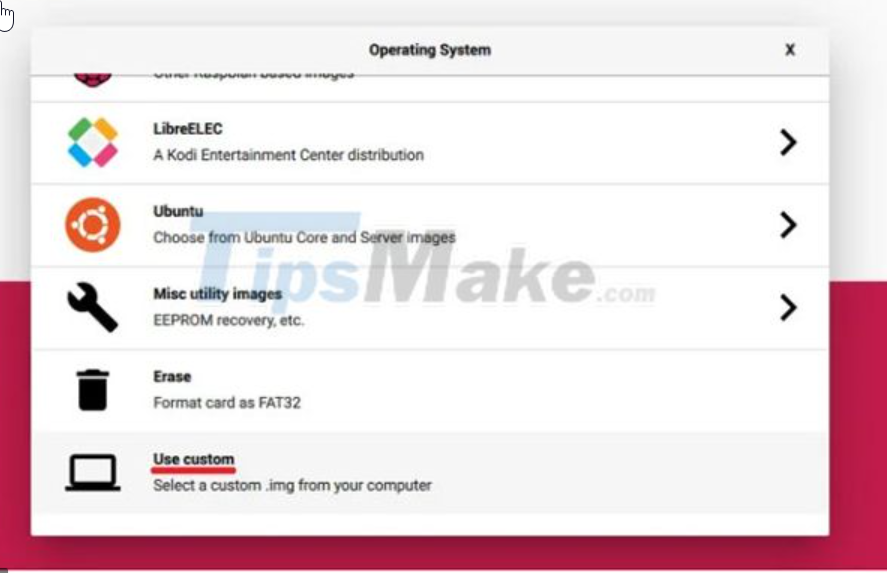
Then, instead of writing to the SD a standard OS you need to choose a “use custom” and select a special OS to be downloaded from this website: https://www.pistar.uk/downloads/
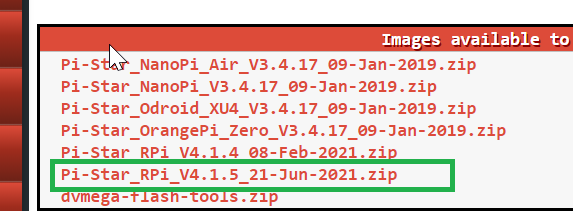
Now you need to unzip the file – inside you will see the main image and checksum. Inside of the Pi Imager, use custom, you need to select the *.img file. Then put at least 2GB SD card into your PC – it will take about 10 minutes to write the OS for the hotspot. Please do not forget, we are not using a standard, graphical OS, it will be a pure Linux text OS, however with access to it from a www browser.
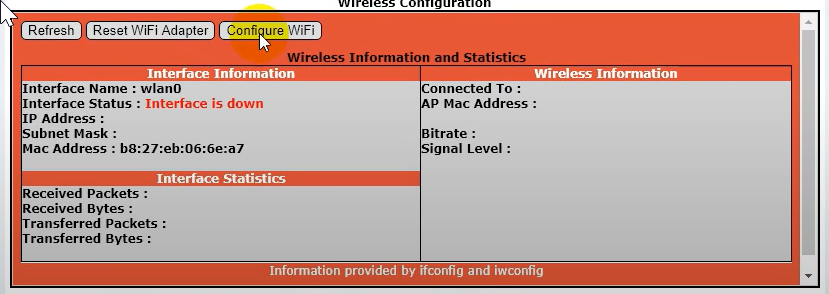
- Now, the next step (regardless you had to create your own SD card or not) is to connect the DMR hotspot to your network. You can skip this step if you decided to buy Pi 3, which comes with a ethernet socket. Then you can just simply stick a network cable and skip this step. If for any reasons you are the owner of Pi 3 – consider to avoid 5GHz WiFi and go to 2.4GHz – I found the cover area of the 5GHz is 1 meter… With 2.4GHz I had no problem with signal going thru few walls. If you own Pi Zero W – you do not have a choice as you can use only 2.4GHz WiFi. So, connect your DMR hotspot to a micro USB power, wait about 2…3 minutes (recently I had to wait 10 minutes!!!!!!!!!!!!!!!), and them in your mobile phone or PC select WiFi network called “pi-star”. The password is raspberry. You should be redirected into a pi-star website generated inside of the DMR hotspot by its OS. If it not happens, type in your browser http://pi-star/ Then go and click configuration. Default login/password is pi-star/raspberry
- Then click configure WiFi
Click scan for Networks
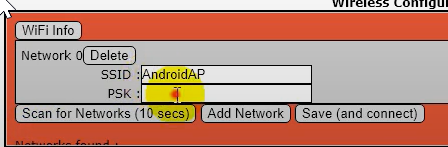
Select your home WiFi and in PSK type your password, then click Save and connect. You will then lost connection to your DMR hotspot, as it gets assigned into your home network. It is worth to consider connecting to your mobile phone, so you can take your DMR hotspot with you and talk on the walk. Anyway, you need to wait probably minute or two and then you can get access to your DMR hotspot again through your browser. If it does not happen, please unplug the Raspberry Pi device and after few seconds power it up again. Just type its IP into your browser (you will see the IP on the DMR hotspot display or you will find it in your WiFi router). In many cases if you type http://pi-star/ it will take you into your home DMR hotspot website.
Now click configure again and type default login/password pi-star / raspberry

Choose if you want to work in simplex or duplex – the best idea is to follow your DMR hotspot repeater type. If it is duplex, select duplex, if simplex, select simplex, you can’t select duplex if your hotspot is simplex (you can, but it won;t work 🙂 ) however you can select simplex if your DMR hotspot is duplex, but what’s a point to do that?
Note you can’t edit all windows in one go, you have to do them one a time and then press Apply Changes, then go to the next window:


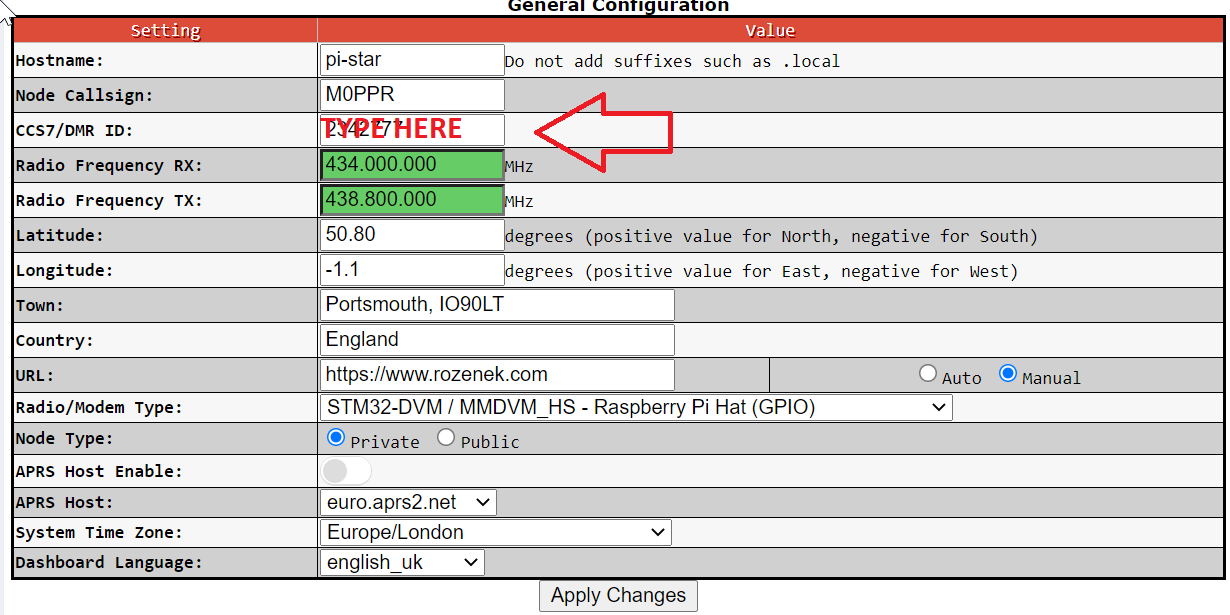
Hostname – leave it unchanged, unless your are configuring a second one in your network! Then, change it to eg. pi-star-2 – then the default login stays pi-star, but (IMPORTANT!) your access to your hotspot changes from http://pi-star/ into http://pi-star-2/ !!! Then type your callsign, type frequency you want to use (see this article) and fill all other windows. Very important is to select correct device type (correct for 90% cases selected on the picture above), keep node type as Private, so nobody else can connect (theoretically) – also you are required by the law to do it in the UK and press Apply Changes.
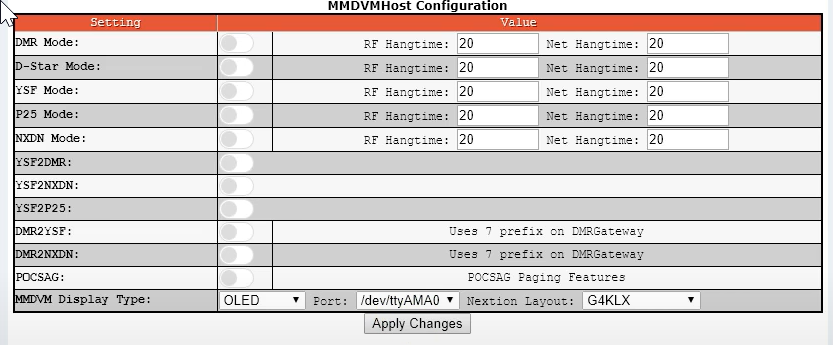
Set up (see picture below) the first DMR option to active and select OLED display if you have one. Click Apply changes.
Important – once you selected DMR – you will have to go back to the previous section and add your own DMR SSID. For a new SSID you need to apply here: https://radioid.net

After applying changes the window above should appear. The configuration is based on a very popular Brandmeister network. If you decide to use any different one (like DMR+) – see other tutorials. I am hiding a bit my SSID – it is not secret, I just would like to avoid situation people will type my own SSID – you need to apply for your own SSID!
At the picture above I am showing a final configuration, but at the beginning (as long as I remember) you will see two drop down menus and I had to select in both DM_2341_UK – as I live in the UK. Mainly you need to select the closest location to the server. Window DMR ESSID – select 01 from drop down menu if it is your first DMR hotspot. Hotspot security password is to be set up in your account at http://brandmeister.network .
Problems? Theoretically ready for use hotspots do not need any adjustment – they should have been adjusted by the manufacturer. It maybe be a diffrent story if you decided to buy a separated kit.
Mainly I am talking about correct audio levels and oscillator (?) frequency correction. It is definitely not the RF frequency adjustment. If you need to adjust it, you need to type http://pi-star/admin/expert/edit_mmdvmhost.php

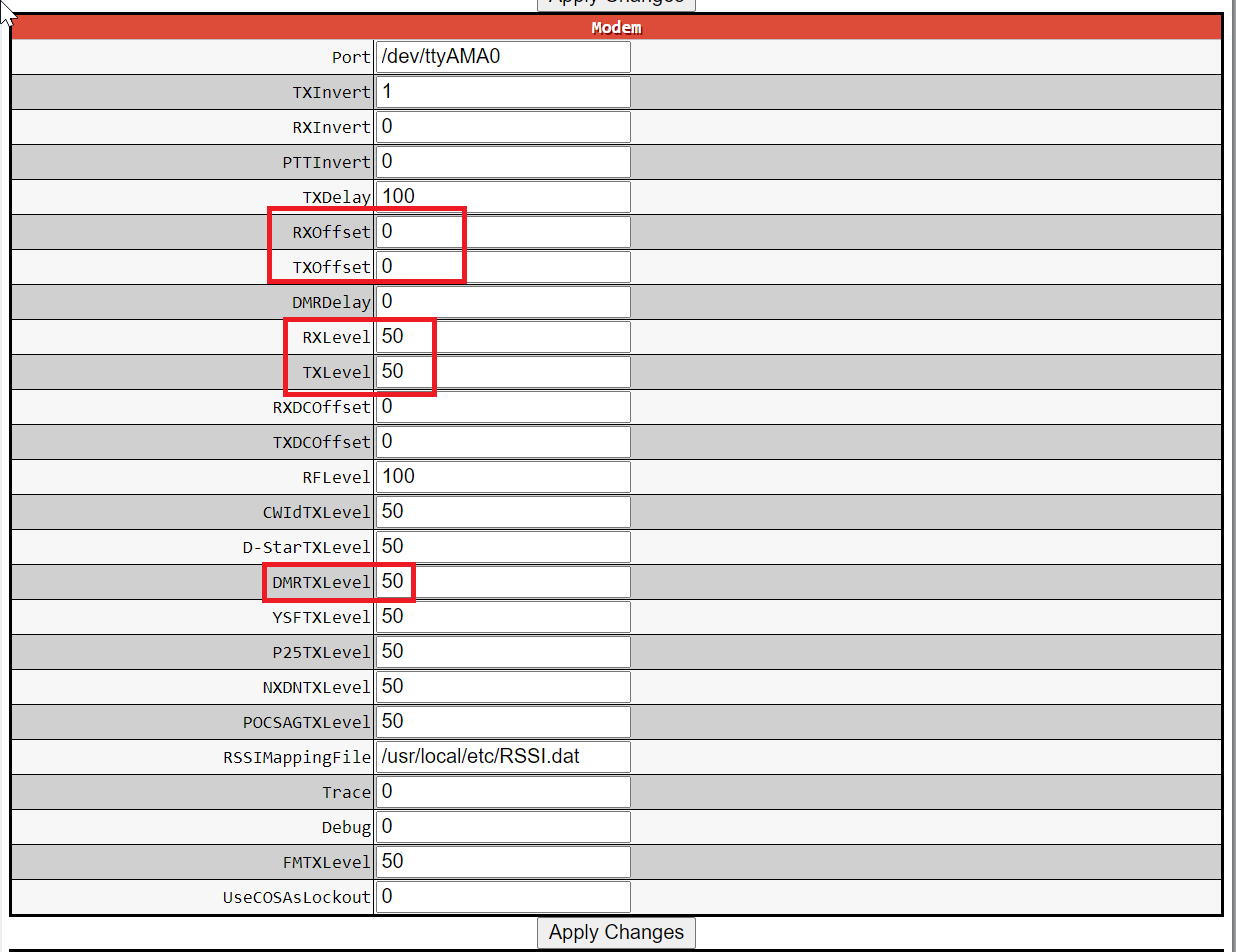
So if for any reasons BER (Bit Error Rate) is like 1…2…3 or more % you can adjust the setting called RXOffset / TXOffset. It should improve the BER for RX or accordingly TX. You need try RX/TX settings like 100,200,300,400 or -100, -200, -300, -400 etc. If we are sure that our handheld radio is exactly on frequency and radio in the hotspot is off, you need to adjust RXOffset to the lowest BER. TX frequency of the hotspot should be checked and adjusted in MMDVMCAL service mode (sudo pistar-mmdvmcal), using appropriate device like a frequency meter or spectrum analyser. Note that the procedure above is applicable only for hotspots, as they use internal radio devices, proper repeaters use external radios so it is impossible to adjust QRG using MMDVM / PI-Star.
Also, if you find the audio level coming into your radio part of the hotspot is incorrect (one more time, theoretically it has been adjusted by the manufacturer!) then you need to adjust RXLevel/TXLevel or actually on my PCB for my proper repeater which I am trying to set up now too, the only setting changing anything to the audio level was setting below, called DMRTXLevel! But the PCB for a proper repeater is a different story. There are some potentiometer too to adjust the levels 🙂 Just google for it – I am indicating the idea!
I really hope my article helped you! I am happy to TRY to help you in the comments below.
Quite helpful info: during testing my mmdvm repeater I found that the usb power cable quality and length is extremely important. I found few times that on too long usb power cable the Rapsbery Pi was behaving correctly but the entire system was unable to decode anything. So please make sure your usb power source is strong enough and cables are as short as possible.
Hello, I am WB8GRX, in southern Ohio.
Can I use my DMR HT to talk to the hotspot, and cross to a DSTAR reflector. Do you have any suggestions on where to look for this information? I have searched Google some, but the results are pretty confusing. I have found some references to the use of an AMBE chip, but no details on how to install or use the chip.
Thank you for your thorough and helpful review of DMR hotspots. Can you share your thoughts on the Skybridge hotspot from Bridgecom? My impression is it is quite pricey for a simplex hotspot, but otherwise?